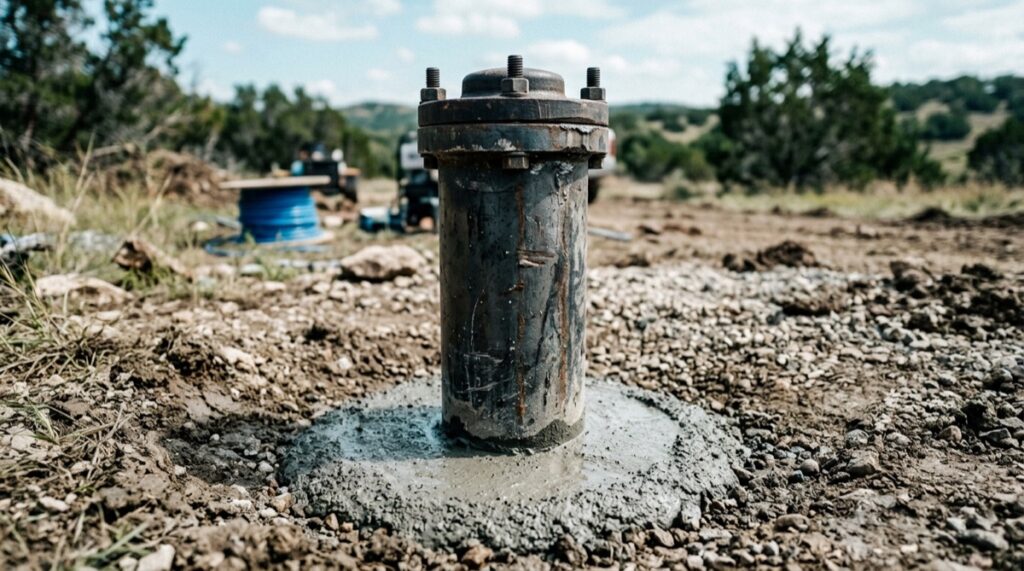
The casing and grout seal are the two components that protect your drinking water from contamination at the surface. If either fails, bacteria, pesticides, fuel, road salt, or dirty runoff may gain a pathway into the well.
Most homeowners do not think about well casing and grouting until a water test fails or muddy water appears after a storm. By then, correcting the problem may require excavation, a casing liner, specialized grouting, or a replacement well. Knowing how your well was built—and recognizing early warning signs—can help you document the condition before requesting an inspection and written scope.
Well casing is both a structural support and a contamination barrier
A drilled well is not just an open hole with a pump hanging in it. Near the surface, soil, sand, gravel, and weathered rock may crumble or shift. Casing is the pipe installed through these materials to maintain an open, protected passage into the well.
The casing performs two related jobs:
- It supports the borehole. The pipe prevents loose formations from collapsing into the well, damaging the pump, or filling the water-producing portion with sediment.
- It separates the well from unwanted water. Watertight casing prevents shallow groundwater, runoff, soil, and contaminated water-bearing layers from entering through the side of the well.
Those jobs explain why casing depth cannot be selected from total well depth alone. A 300-foot well might require only the upper portion to be cased if it enters stable, competent bedrock. Another well may need casing much farther down because it passes through deep sand, fractured formations, poor-quality groundwater, or unstable rock.
Steel, PVC, and stainless steel each have different strengths
The principal casing materials found in modern residential wells are carbon steel, thermoplastic pipe such as PVC, and stainless steel. The U.S. Environmental Protection Agency’s overview of private wells identifies all three, while noting that local geology influences what may be used.
| Material | Where it is commonly encountered | Important limitations |
|---|---|---|
| Carbon steel | Widely used in drilled wells because it tolerates driving, welding, and demanding rock conditions. | Can corrode in aggressive water or soil. Wall thickness and approved joint construction matter. |
| PVC or other approved thermoplastic | Often used in shallow wells and unconsolidated formations, and in deeper wells where local rules and construction methods permit it. | Requires the correct pressure rating and wall thickness. Above-ground sections need protection from impact, heat, fire, and sunlight exposure where required. |
| Stainless steel | Selected for some corrosive water conditions or where the proposed material is compatible with the site and water chemistry. | The grade of stainless and the joining method must suit the water chemistry. Ask for the proposed grade, joining method, and material basis in writing. |
PVC should not automatically be treated as a universal replacement for corroded steel. Some jurisdictions restrict thermoplastic casing in particular formations or require steel where casing must be driven into rock. A licensed U.S. well contractor or properly licensed Canadian well technician should match the material to the code, drilling method, soil, bedrock, expected loads, and water chemistry.
Casing diameter determines what can fit inside the well
Residential drilled-well casing commonly has a nominal diameter of 4, 5, 6, or 8 inches. Six-inch casing is especially familiar because it provides room for many common submersible pumps, the power cable, drop pipe, and service tools. Four-inch wells may have tighter equipment choices, while larger casing may be selected for higher-capacity pumps, unusual formations, or commercial and agricultural demand.
The nominal size is not the whole story. Actual inside diameter changes with the material and wall thickness. Pump manufacturers also require clearance around the motor for installation and cooling. A pump that technically enters a casing may still leave too little room for its cable, splice, fittings, or later removal.
Diameter becomes even more important if a damaged well needs a liner. A liner is a smaller pipe placed inside the original casing. It reduces the available opening, which may require a narrower pump or make an existing pump impossible to reinstall. That fit should be confirmed before a liner is ordered.
Grout closes the hidden pathway outside the casing
Drilling normally creates a hole larger than the casing. The ring-shaped space between the outside of the casing and the borehole wall is called the annular space. Grout is the low-permeability sealing material placed in that space.
Without an effective annular seal, water can follow disturbed soil and fractures down the outside of the casing. That route may let runoff bypass the natural soil layers that would otherwise slow or filter contaminants. It can also connect shallow, poor-quality groundwater with a deeper aquifer.
Grout therefore does something the casing cannot do by itself: it seals the casing to the surrounding earth or rock. Ontario’s official guidance on sealing annular space describes the objective as preventing water, contaminants, gas, and other material from moving between the surface and underground formations.
The three grout families homeowners are likely to see
- Neat cement grout is a pumpable mixture of Portland cement and water without sand or gravel. It can create a strong, low-permeability seal and is commonly used to seal casing into bedrock. The water-to-cement ratio, placement method, temperature, and curing time affect the result.
- Bentonite grout uses a natural clay that swells when properly hydrated. It may be supplied as slurry, chips, or pellets. The product and placement method must be approved for the well conditions; salinity and other water chemistry can interfere with hydration.
- Bentonite-cement grout combines the materials to adjust properties such as pumpability, shrinkage, and sealing performance. It is not a homemade recipe. The mixture has to meet the governing rule or approved product specification.
The correct choice depends on the formation, water chemistry, annular-space width, depth, casing material, and local standard. More water does not make cement grout better; an overly wet mix may shrink or fail to develop the intended seal. Bentonite can also bridge across a narrow opening, leaving an unsealed void below it.
Why grout is generally placed from the bottom upward
For many drilled wells, grout is delivered through a tremie pipe—a grout tube lowered to the bottom of the interval being sealed. Pumping from the bottom upward displaces water and drilling fluid while reducing the risk of gaps. Merely pouring material around the casing from the surface can allow it to jam partway down while an unseen cavity remains below.
Many codes require bottom-up placement, particularly when the annular space contains water or the seal extends beyond a limited depth. The exact method is part of the construction standard, not a cosmetic detail.
In a bedrock well, casing is normally extended through loose material and weathered rock, then sealed into competent bedrock—rock solid enough to support a durable casing seat. In sand-and-gravel wells, casing and screen arrangements differ, but the upper annular space still needs a protective seal. Depending on local rules, grout may extend from the surface to competent bedrock, to the bottom of the casing, or to a specified minimum depth.
Well casing and grouting codes are local for a reason
There is no single casing-and-grout depth that governs every private well in the United States and Canada. U.S. requirements are generally established by states and may be administered or supplemented by counties, health departments, or groundwater districts. Canadian requirements are set through provincial or territorial law, with local public-health and permitting requirements sometimes adding another layer.
Codes vary because the hazards vary. Officials have to account for:
- depth to the water table;
- thickness and stability of soil and overburden;
- weathered, fractured, or karst bedrock;
- the presence of multiple water-bearing zones;
- flooding and seasonal groundwater conditions;
- nearby septic systems, farms, fuel storage, roads, and industrial land; and
- the construction method and intended use of the well.
Twenty feet is common, but it is not a universal answer
A minimum of 20 feet of protected or grouted casing—roughly 6 metres—is found in a number of U.S. standards. For example, current Virginia private-well rules use 20 feet for some well classes but 50 feet for others. Wisconsin guidance for private wells in granite calls for at least 40 feet of approved steel casing under the conditions it describes. These differences are exactly why a contractor should not bid a well from a national minimum copied from the internet.
Canadian rules differ as well. Ontario requires annular spaces to be sealed against movement of contaminants and includes construction-specific dimensions and exceptions. British Columbia’s Ground Water Protection Regulation sets surface-seal, casing, and wellhead requirements that depend on the type and depth of construction.
The enforceable requirement is the one applying at the property when the work is done. Older wells may have been lawful under an earlier standard, may have incomplete records, or may never have complied. Repairing or altering one can also trigger current requirements for permits, disinfection, testing, reporting, or work by a licensed contractor or licensed/licenced technician.
Your well log is the first place to look
A well log—often called a well record, drilling report, or water-well record—is the construction history filed by the driller. Depending on the jurisdiction and age of the well, it may show:
- total well depth;
- casing diameter, material, and depth;
- borehole diameter;
- grout material, quantity, placement method, and sealed interval;
- soil and rock formations encountered;
- depths where water was found;
- screen position, if the well has a screen;
- static water level and pumping-test results; and
- the contractor and completion date.
Many states maintain searchable well-log databases through a geological survey, natural-resources department, or health agency. Provinces may provide a well-record database or records request service. Search by address, parcel, coordinates, owner name, well identification number, or the number on the well tag.
Do not assume the nearest record belongs to your well. Rural parcels may have several active, unused, or abandoned wells. Compare the location sketch, drilling date, depth, and casing details with the physical well and property history.
An absent or vague log does not establish that the well lacks grout. It means the construction has not been documented well enough for that conclusion. A contractor may use measurements, a downhole camera, casing-depth tools, water testing, and knowledge of local geology to investigate further.
Casing failure often shows up first as a change in the water
Some casing damage is visible above ground. Much of it is not. Pay attention to changes in water quality and to when those changes occur.
Bacteria appears in a well that previously tested clean
A new total-coliform result can indicate that surface water or shallow groundwater is entering the well. A casing crack, failed joint, defective cap, disturbed grout seal, buried wellhead, or poorly sealed pipe opening may be responsible.
One positive result does not identify the entry point. Contamination can also arise from sampling errors, recent pump work, household plumbing, flooding, septic problems, or the aquifer itself. The useful clue is the pattern: repeated bacteria after proper sampling and disinfection—especially in a well with a long clean history—deserves a construction inspection.
If E. coli or fecal contamination is reported, follow your health authority’s instructions and use an approved alternative drinking-water source until the well has been corrected, disinfected, and cleared by the required follow-up testing. Chlorination can disinfect the well, but it does not repair a crack or missing seal.
Water changes after heavy rain or snowmelt
Cloudiness, sediment, odor, color, or bacteria that appears after storms strongly suggests a connection with shallow water. Surface water may be entering through the cap, a low wellhead, a damaged casing, or the annular space.
Rain-related timing is evidence worth documenting, but it is not proof of one particular defect. Note the rainfall, when the change began, how long it lasted, and whether nearby flooding or excavation occurred. Give that timeline to the well contractor and laboratory.
Corrosion or damage is visible at the wellhead
Inspect the exposed casing several times a year and after a vehicle strike, fallen branch, landscaping work, or severe freeze-thaw movement. Look for:
- deep rust scaling, holes, splits, or cracked welds;
- a casing that leans or moves when lightly checked;
- cracked PVC or material degraded by sunlight;
- openings around wires, pipes, or vents;
- a loose, cracked, or missing cap; and
- evidence that equipment has struck the wellhead.
Surface corrosion does not reveal the condition below grade. Steel can look acceptable above ground while thinning near the water table, at threaded joints, or where soil chemistry is aggressive.
The soil settles beside the casing
A depression, crack, or widening gap around the wellhead may indicate soil settlement, erosion, frost movement, or loss of material into an inadequately sealed annular space. It also creates a place for rain and snowmelt to collect against the casing.
Do not fill a deep or recurring depression and consider the matter resolved. The cause needs to be evaluated first. Added soil may conceal an opening without restoring the underground seal.
Repair depends on where the failure is—not just what it looks like
The first paid step should usually be diagnosis. A contractor may remove the pump, inspect the casing with a downhole camera, measure casing depth, assess the wellhead and surrounding grade, review the well log, and compare water results before and after rain. Testing may include total coliform and E. coli, with additional analysis selected for nearby risks such as fuel, agriculture, septic systems, or road salt.
The repair then has to address the actual pathway.
A casing liner creates a new wall inside the old casing
A liner or sleeve may rehabilitate a well when the original casing has localized damage or deterioration but the remaining well is stable enough to reuse. The contractor installs a smaller approved casing inside the existing casing and seals it according to the repair design and local requirements.
A liner has trade-offs. It reduces the well’s inside diameter, may require a smaller pump, and can complicate access to the producing zone. It also does not automatically correct every failed exterior grout seal. The connection and sealing details have to prevent water from travelling between the old and new casing.
Re-grouting may seal an accessible annular-space defect
If the problem is confined near the surface, excavation and replacement of the upper seal may be possible. Deeper voids may require pressure grouting or another method that places approved material into the defective interval.
Re-grouting is highly dependent on access. There may be too little space outside the casing for a grout tube. Old material, collapsed soil, multiple casings, a pitless adapter, groundwater flow, or unknown construction may prevent a continuous seal from being placed. Pumping grout without knowing where it can travel risks putting material into the well or the water-producing formation.
Some wells should be decommissioned and replaced
A new well may be the more defensible choice when corrosion is widespread, the casing is collapsing, repeated repairs have failed, contaminated zones cannot be isolated, or a liner would leave inadequate space for a suitable pump. Replacement also deserves consideration when the existing well has poor yield, unsafe siting, undocumented construction, or several defects that a casing repair would leave unresolved.
Decommissioning means filling and sealing the unused well according to local rules so it cannot continue acting as a vertical contamination pathway. Cutting off the casing and covering it with soil is not proper abandonment. The old well and the replacement well normally require separate records.
Compare casing-repair and replacement scopes
Use the well-cost planning guide as a starting point, then request a property-specific written scope. Ask each provider to state USD for a U.S. project or CAD for a Canadian project and itemize equipment access, depth assumptions, casing diameter, pump removal, rock or groundwater allowances, permits, disposal, grout volume, water testing, travel, taxes, quote date, validity period, exclusions, and change responsibilities.
| Work | Itemized scope question | Property and work details to confirm |
|---|---|---|
| Downhole camera and initial casing investigation | Are diagnosis, pump removal, camera work, footage, measurements, travel, and the written report included? | Pump removal, depth, access, additional measurements, and written reporting |
| Localized sleeve or casing liner | Which liner material, length, sealing work, pump work, testing, permits, and records provided at completion are included? | Length, material, casing size, pump compatibility, and whether the full depth must be lined |
| Surface-seal repair or re-grouting | Which investigation, excavation, grout material and placement, pump work, testing, permits, restoration, and records are included? | Depth, excavation, grout placement method, obstructions, groundwater flow, and permit requirements |
| Decommissioning and drilling a replacement well | Are old-well decommissioning, the new borehole, casing, grout, pump system, trenching, electrical work, testing, treatment, permits, restoration, and records included? | Unknown drilling depth, geology, required casing, pump system, trenching, electrical work, testing, treatment, and sealing the old well |
Ask each provider to separate inspection, pump removal and reinstallation, casing or grout work, permits, disinfection, laboratory testing, old-well decommissioning, taxes, allowances, and exclusions. Compare quote dates, validity periods, payment terms, and who must approve changes.
The wellhead is your first line of defense
The part of the well you can see deserves regular attention. A proper wellhead prevents water and pests from entering directly while keeping the top of the casing away from ponded runoff.
Use a sanitary, vermin-resistant cap
The cap should be manufactured for a drinking-water well, secured to the casing, and sealed around electrical cables and other penetrations. Vents should face downward and have an intact screen where required. A loose metal cover, inverted bucket, wooden box, or improvised plug does not provide the same protection.
Check the gasket, fasteners, vent screen, cable openings, and casing connection. Insects are small enough to enter gaps that look insignificant from standing height.
Keep the casing above the required grade
Minimum height varies. Minnesota materials commonly require at least 12 inches above established ground for relevant well types, while Ontario generally requires new-well casing to reach at least 40 centimetres, or about 16 inches, above the highest nearby ground within a 3-metre radius. Flood-prone sites may require or justify greater protection.
Do not raise the surrounding landscaping until a compliant casing looks buried. Mulch, new soil, paving, and driveway work can change the effective grade. If the wellhead is too low, have a qualified contractor assess a compliant casing extension and pitless connection.
Grade the ground so water moves away
The soil immediately around the casing should be firm and gently mounded so rain and melting snow drain away in every direction. Correct low spots created by settlement, tire ruts, landscaping, or frost movement after the cause has been checked. Keep roof downspouts, irrigation discharge, chemical mixing, fuel filling, animal areas, and snow piles away from the wellhead.
The EPA advises homeowners to keep the casing above land surface, install a well cap or sanitary seal, and slope the area so runoff drains away. Ontario likewise requires drainage that prevents ponding around the well. Those visible protections cannot replace underground casing and grout, but they reduce the amount of contaminated water challenging the seal.
A well can continue producing clear, good-tasting water while its sanitary protection deteriorates. Maintain the well record, preserve laboratory results, inspect the wellhead, and investigate changes rather than waiting for the pump to stop. With well casing and grouting, the most important failure is often not loss of water—it is the loss of the barrier between surface activity and the water your household drinks.